Day 1
30 September 2006 (late night/early Morning)
Posted by Minis On The Edge
I received a order for a Beacon Hill on September 18th. The house is to be for my customers Mother who was brought up during the Depression and always wanted a dollhouse. This will be a surprise gift for her. My customer needed the house completed and delivered by October 6th. Could I do it. Well I said of Course I can . But after finding out the size of of her mother's house, she decided that she wanted me to build the Westville house instead. And then the fun began!!
I ran downstairs to my garage and pulled out the Westville kit and opened it. As usual, I checked all of the sheets to be sure I had them all. All the while, I was thinking about my customer. How sweet of her to do this for her Mother! So I started to get nervous. Will I meet her expectations? She want the house to be White the trim to be Hunter Green. Of course, I told myself last year that when I build this house again, it would be ALL paper clay. Well, maybe I can get a little bit in but my customer wants it to be built as it is on the box so I must restrain my creative ideas!
Join me for the fun! Because I was under such time restraints, I did not blog while I was building. I just did not have time to do it so, I took pictures for the customer (I create a special "private" album as I build custom houses for customers so they can comment and see what I am doing as I build).
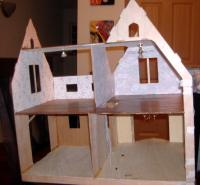
These are the picture from my first day! The shell went together so fast that this is the only picture I took. I blinked and it seemed all of the walls were up!

She mentioned she would love for me to electrify the house so I am doing that. First I drill a hole on the first floor ceiling and the 2nd floor "floor"

I then pull the wire through that

I did this for all of the rooms. I then cover the wire with tape to keep them flat and to be sure that they are covered when I add the glue to cover the wire with the hardwood floors I am using


This is what the house looked like at the end of Day one:

30 September 2006 (Day 2)
Posted by Minis On The Edge
Today I selected the wall paper. My customer says her mother has flower wallpaper. She has blue flowers in one, forest green and she also has a yellow colored wallpaper in here house. So I looked through my big stash and came up with these


I add my wallpaper as I build. To me this is the easiest way and the neatest way to add the wallpaper. I sure wish Linda lived closer to me! I added the bay windows today too and there sure are a lot of gaps here. I took out my handy dandy spackle to fill those spots. I tell you, this stuff really does a great job for sure!

30 September 2006 (Day 3)
Posted by Minis On The Edge
Today I added the window sills & Trim to this beautiful house. I love the style of this house!

This was all l did today. It seems like just a little bit but you gotta remember that each one had to be punched out and sanded then painted. I am wondering will I be finished in time?


I also decided to add the siding to the porch so that I could add the door trim. I had a problem with the window & siding. I did not like how it was butting up and decided I have to do more cutting than I anticipated:


30 September 2006 (Day four)
Posted by Minis On The Edge
The bays are looking a bit too plain to me! I keep looking at this house and trying to figure out what I want to do with it. My customer does not want paper clay on the bay . I gotta put on my OTHER creative hat to figure out something. Meanwhile, I decided to add all of the siding on the house now. It is easier to do this now instead of waiting till the roof is on. I also tape down all of the lose wires now and cover them with siding.


30 September 2006 (Day 5)
Posted by Minis On The Edge
Well, I came up with an idea for those boring bays!! I took out my spackle and found my brass stencils and decided to add some details to the rectangles that are in the bays.


I also started painting the house. As I started doing this, I decided that the Bays were still too plain and I decided to add some wood rope trim to the top parts of the house.


I am Moving my dollhouse Build blogs to this blog to help other find my many projects online. Hope this is able to help all of you out there who get too overwhelmed to complete the build. The Next Blog post will show the other days of this build. Thank You For Following Along with this Blog!
***Edited to add****
I just looked in my webshots albums and discovered I do have better pictures of the complete build (which has more shots than I blogged previously) You can see that album by clicking the picture or link below:

by toppdollar


No comments:
Post a Comment