06 June 2006
Posted by Minis On The Edge
It's Electric
I decided to show a little bit how I electrify the houses. I find it hard to explain in words but pictures talk in words that I may not express well so here you go.
I am just adding the extra outlets that my customer wants in this house right now so that is what the pictures will show. I started out with an electrical outlet with a plug at the end pictured below. The end plug will fit into the electrical strip later on.
I am just adding the extra outlets that my customer wants in this house right now so that is what the pictures will show. I started out with an electrical outlet with a plug at the end pictured below. The end plug will fit into the electrical strip later on.
Now, drill a hole in the floor where you would like to add the outlet so you can feed the wire through the ceiling and down below the base of the house
Now, take the plug and remove the prongs at the end of the plug. Place them in a cup or soda pop top where you can find them easily! They are so small that if they fall on the floor, they find a way to blend into the carpet or wood floors you may have
Now, gently remove the plug base (the white part) from the wire
Now, take that wire and feed it through the hole that you drilled in the floor of the house
Take the paper off of the back of the outlet and stick it into place on the wall
After you feed the wire through the hole all the way to the base or bottom of the house, you will then start adding the parts back starting with feeding the wire through the plug (white part)
After folding ONE wire in EACH hole (Two wires so one wire should fit in each of the two holes), you will then add the brass prongs in the hole in contact of the wire
You can now plug this into a power strip and use your outlet. You can hide the wire behind moldings so they will not be noticed easily.
Hope this helps. I will try and take pictures and show the next step when I get to that part while I assemble the house.
13 August 2006
Posted by Minis On The Edge
Stair Placement & Partitions
Now it's time to glue the staircases in. If you want your foyer to look neat and decorated nicely, NOW is the time to do it (Before you add the kitchen wall and glue in the stairs). It will be VERY hard to reach these areas later on. Originally, I thought a partition went in a different place which means I messed up my flooring! 
Please note WHERE these partitions go so you won't make the same mistakes. Notice that the wires for the lights are taped out of the way while I build. I am using paperclay on the inside walls but you can hide these wires later by using wood trim that has a groove cut in it to hold these wires so that you'll never see them.
Please note WHERE these partitions go so you won't make the same mistakes. Notice that the wires for the lights are taped out of the way while I build. I am using paperclay on the inside walls but you can hide these wires later by using wood trim that has a groove cut in it to hold these wires so that you'll never see them.
Right Wall & Bay Sides & Back Foundation Wall
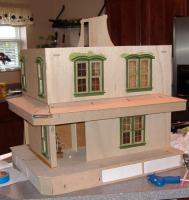
This house is coming along WONDERFULLY!!! It has so many details that are missed from the 2 pictures shown on the box of this kit!! I am totally in LOVE with it's design. The bays went together easily and so did the back wall of this house. Here are pictures of where it goes and how
Porch Assembly
Now this part was a little tricky for me because I do not plan to use the lattice trim on my porch. My foundation will have clay with stones sculpted in them.
Be sure to follow the instructions and lay the house on it's back while you assemble the foundation part. It is VERY important to position porch foundation piece # 1 into foundation slot in the order as noted on the drawings or else it will NOT fit right (I bet you can figure out how I know that one )
)
Be sure to follow the instructions and lay the house on it's back while you assemble the foundation part. It is VERY important to position porch foundation piece # 1 into foundation slot in the order as noted on the drawings or else it will NOT fit right (I bet you can figure out how I know that one
I also had issues finding the porch ends for the top and spent time talking to Lynette (Nutti) on the phone as we both tried to figure the porch roof parts. We got off the phone and I was still a little lost but I pushed forward and was able to finally figure it out. I am such a visual learner and not having pictures with these instructions for this kit really threw me off completely for a bit. I was afraid to use my glue LOL.
The Thought Of The Day ~ Mistakes are painful when they happen, but years later, a collection of mistakes is what is called experience.
Thank You For Taking The Time To Read My Blog Today!! Hope You Have a Great Day!
Tracy
♥☆♥♥☆♥♥☆♥♥☆♥♥☆♥♥☆♥♥☆♥


No comments:
Post a Comment