The Little girl inside of me must really want out because this project is actually flowing totally according to my plans. Last night I went to bed very late (or early depending on what you call 1 am). I had my music pumping and I was going with the flow. Sometimes, when I am thinking too hard about other things (real life things), my creative juices goes into overload.
First, right before I went to bed last night, I started on this bed for the upstairs room. The rooms in this kit are very small so I wanted to utilize the space and give the impression that there is more space in here than it actually is.
I have always considered my style of artistry to be more on the side of an Impressionist. The definition of Impressionist is * a literary or artistic style that seeks to capture a feeling or experience rather than to achieve accurate depiction. Through my blogging of this cottage, I wish to share with you new inexpensive ways to achieve the look of some expensive things that we buy in miniature. You will be able to do this with card board scrap pieces of wood and dollhouse wallpaper or even scrapbook paper. My goal is to try and help YOU, learn how to achieve the look of realism by applying skills of an Impressionist.
I already knew that today, I would do a tutorial. After I started making this bed last night, I wish I had been more awake so that I would have thought to take out the camera to take pictures of How I created it. Here is a shot of the Bed I started on last night and at the end, you'll see what it ended up looking like when I completed it.
Today's tutorial will be on how to make a Cornice. You will need:
cardboard, scissors, tacky glue, wallpaper (or scrapbook paper), balsa wood and lace trim. First, you need to take your cardboard and cut it a little bit wider than the width of your window. I will not use measurements because, every window has different sizes. You can also cut your wallpaper pattern. It should look like this when cut:
Next, take your tacky glue and spread glue over the entire piece of cardboard. You can then glue the wallpaper to the cardboard. You can use a credit card to smooth the wallpaper down to be sure there are no bubbles. It should look like this:
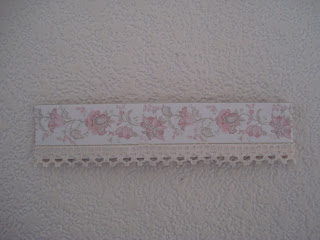
Next, you will take your lace trim and glue it to the bottom edge of your wallpaper
It should look like this when that step is completed
Next, you can take your wood and cut it a little bit shorter than your Cornice piece like this:
Bend each end of your Cornice and glue the wood block in place to help keep the shape of the Cornice when glued in place. Turn your Cornice over because once the glue is dry, it is ready to be attached. It should look like this when completed:
You can even add an extra step by adding some lace curtains. I just used some lace found at Hobby Lobby or Micheal's. You would do this by gluing the lace to the backside of the Cornice before you attach it to the wall.
This is what the room looked like at the end of today:
Upstairs
Downstairs
I did my workout this morning. I totally believe that having a healthy body & mind helps me be the Best person I can be for myself & my family and I can share my best and most creative work with my clients.
Today my workout consisted of Shoulders & Arms & Ab RipperX (P90X) . I hurt all over but, it feels great because it's a "good" hurt. Thought Of The Day ~ "Be not angry that you cannot make others as you wish them to be, since you cannot make yourself as you wish to be" ~ Thomas à Kempis
Many times, we look at others successes or accomplishments and think we can never reach our individual goals because we view the other person as someone not human. Each of us are just plain human beings. Set you Goals and work towards achieving them! Keep them in front of you! So many of my friends are working out to get healthy this year. It's so fun to share Minis & healthy living with them. Feel free to join us too. You are not alone!
Thanks for stopping by to read my blog today!
Wednesday, January 19, 2011
Subscribe to:
Post Comments (Atom)


2 comments:
Thanks for the tutorial....I plan on trying it. The shabby chic room is looking great. I started a workout routine as well...I've been sleeping like a baby ever since.
Tracy, I just LOVE the look and how it all goes together purr-fectly. Now this will be used as sheer inspiration when I get the lighthouse.... And you are so right about the work out and feeling great!
Hugs and thanks for sharing!
Anna
Post a Comment