Translate

Showing posts with label Tracy Topps Dollhouse Tutorials. Show all posts

Tuesday, June 14, 2011

Magnolia Dollhouse Build Completed


April 9th 2007
Posted by Minis On The Edge
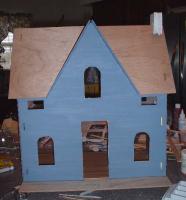
The "Maggie" Dollhouse Kit Day 10

Today I had to add the shingles and add a base to this house. I had a total ball building this house. The windows and porches are Wonderful. This is the PERFECT house for the Newbie. It's Great for a Child and is also WONDERFUL for the Dollhouse Collector! I stained the Shingles a Dark Mahogany 


This is the Greenleaf Magnolia Dollhouse built By Minis On The Edge (Tracy Topps). This house was done for a Customer of mine who wanted this house built for his Grand Daughter for their Christmas Holiday. He was in the VA hospital and was not expected to live through the new year (which would have been 2007) . He wanted to purchase a lasting gift to give to his Grand daughter and so while in the hospital, he tried to build this kit along with the help of a couple of nurses. 

On November 30th 2006, I received the phone call from him and he told me his story. TJ was such a sweet man and I promised him that I would have this house built and sent to him in the hospital in time to surprise his Grand daughter. He had someone else making something special for his Grandson. I  started building this house on December 2nd. I was so happy to complete it in time for them. I was worried and up late several nights because I was worried about letting him down.

He sent me pictures of his family (I asked him to send me 3 of his favorite family pictures and I would surprise him with something special) I added one of the pictures he sent me of his daughter along with her husband and kids to the living room. I hung it above the fireplace. I also added a picture of him on the mantle and in the one bedroom on the wall. I gave a grandpa doll along with a card for him to give to his grand daughter. The doll looked so much like him and it was a new product that I had ordered during the summer of 2006. It came in 2 days before I shipped this house and the grandpa doll looked so much like TJ I had to give it to him.
dscf1190
I had a matter of days to build it and I built this house, wallpapered & electrified it in 10 days! It was a complete joy to do this for him & his family and I still think about him from time to time and wonder how they all are doing. When I did the blog for this house finally in the spring of 2007, I had just received another letter from him (My neighbor had gotten it months before and was afraid to give it to me because she accidentally opened it thinking it was her mail since the mail person had put it in her mailbox). 

In January 2007, I received a letter in the mail with a picture of his Grand daughter with the house:


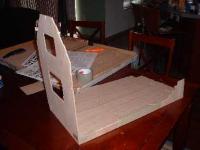
Here are pictures I took as I started building this house all the way till completion of it. I do this so that my customers can see how things are coming along as I build for them.


Thought of the day ~ You know you're in love when the hardest thing to say is goodbye.

I hope you all are having a Fantastic Day ! Thank you for stopping by to read my blog today.

Monday, May 23, 2011

The Glencroft Dollhouse Starting The Build

 Day One (Original Blog Post was on June 15, 2005)

I was so excited when I received this kit in the mail. I totally LOVE Cottages and Tudor styled cottages are even better!!

I thought this house was going to be a piece of cake. Shucks, I had put together so many Greenleaf kits (some even bigger than this one). I was in for a BIG surprise!! On a level of 1 - 10 based on difficulty, I must say this kit is at an 7. There are SO many parts to it!

When I first started on direction part A1 - A3 it went together similar to the others:


By the time we got to A4 that is when the headache began. It was not hard, it was just so many parts to locate, label then figure out where it went. It took me 2 hours to do step A1 - A18


I thought I would be further along and I went to my OLD directions (from the 1983 Glencroft kit) several times to see an actual picture of the steps. I must say, the newer ones (the drawings) are easier to follow because the parts are marked "A, B, C etc...

This is going to be a Wonderful house when completed. Just be sure to KNOW, you will spend some time on it. Just looking at the shell, I have decided wallpaper for a couple of the rooms. This house has plenty of character and Charm. This is going to be a WONDERFUL ride!! :p I did not know I was going to be challenged with this house and I am pretty glad because it can get dull building quick build houses all of the time.

Thank you for reading my blog!


Sunday, May 22, 2011

Arthur dollhouse kit Shingles touch up paint

Okay, I have done the touch up to the shingles and they look MUCH better!

I think I will jazz up the house and add the base sooner than later. I can't picture my houses without the yard so I will start on that next even though for the most part, I am finished!! :p Okay....are we ever really finished with a house ;) . Here are some more pictures and there will be more to come since I am going to do the base....TODAY!! ;)


The doll below is Charles. He is the Real Estate agent trying to sell this guest a house that has a bedroom with flowers on the wallpaper :p LOL ;)


Arthur Dollhouse Kit How 2 Make Burning Embers

Today has been one of those days for me. Some of you may know but I have Graves disease and sometimes I just feel "not so good". Today just so happen to be one of those days for me, I only did a small thing. 

I made burning embers for my fireplace. Let's get started!!! First off, you can not burn your self :p You need 1 Red Straw, 1 small tree branch, a tooth pick, Train ballast, Clear "Liquid Nails" (or clear silicon sealer) and a Small piece of wax paper.

Take the straw and with your scissors, cut a 1" piece and a 1/2" piece.


Second, cut a small circle (or triangle) into the middle of the 1" straw piece.


Third, take the small 1/2" sized straw piece and insert it into the bigger 1" sized straw.


Fourth, Take your straw and put it on top of the wax paper. Take you clear Silicone (or liquid nails) and put a squirt on top of the straw (be sure none cover the 3 holes (one on each side and one in the back).

Fifth, Cut your logs in 1" sizes (varying a little) be sure they will fit inside your fireplace!! Take your logs and position them as they would look in a fireplace. Use your toothpick to shape spikes so it will look like flames licking the logs. Sprinkle some ballast on top of this so some will rest on the logs and under the front of the logs.


Let this dry for about 2 - 3 hours Sixth, Add a dry brush of black paint over the logs and ballast to make them look burnt. Insert the back opening over the light bulb in your fireplace.
Now turn on your light and enjoy your burning embers 

Let this dry for about 2 - 3 hours Sixth, Add a dry brush of black paint over the logs and ballast to make them look burnt. Insert the back opening over the light bulb in your fireplace.

Now turn on your light and enjoy the look of your burning embers!!


Arthur Dollhouse Kit Foundation Stones

I have finally started on the foundation and only have the back part left to complete. I added Creative Paper Clay ( www.paperclay.com ) to the foundation and sculpted stones to give it an authentic look of real stone. The trick comes in with the painting which has not started yet because I must wait for the clay to dry.
To add the clay, first I add some wood glue to the object I wish to paper clay. In the pictures, I used my chimney.

The second step it to roll the clay to the thickness of pie dough crust.
After that, The third step is to apply the clay starting at the edges and cut off any access.

The fourth step is to start to sculpt your stone with sculpting tools. You can even use a popscicle stick and cut the round edge off to make it flat. It may even help you to have a picture of the type of stone you wish to use.

The fifth step is to reshape some of your stones which may have shifted and you do this by using a stylus or I have heard of some using the edge of a fine paintbrush (the handle end of it).
Now, let it dry and then you paint and enjoy the look!!Now I have to complete the back foundation. All together it took me 45 minutes. It WILL take you longer. I have done MANY houses so it does take practice and some getting used to. Be patient and remember, HAVE FUN!!

Arthur Dollhouse Kit, Stained Glass Windows & Porch

All right, I now have painted the siding. It took me 2 coats of paint. I painted it Cape Cod blue. The paint is by Delta. I am thinking about painting the trim either all white or burgundy with cream accents. I am VERY pleased at how things are turning out. It took me another 45 minutes to paint the exterior and it is still cold and raining outside so there is nothing better to do on a rainy day but play dollhouses. 


My girls are both repainting there house with me on the counter (Yeap, I had to clean it up as you may have noticed I am a VERY messy worker LOL :p ). I am working on my kitchen Island which happens to be a good size, which is why I create such BIG messes.

I decided to go with the color "Black Cherry" by Delta. After that dried, I began to assemble my windows & shutters. As you can see, I added new window inserts and did not use the ones that came with the dollhouse kit. 


I bought a book titled "Ready-to-Use Dollhouse Stained Glass Windows" by Ed Sibbett Jr.

I picked the ones I wanted to use for this house. After choosing them and scanning them into my computer, I resized them and created tranparencies of them. I then add clear finger nail polish on the rough side. I color them in by using permanent markers.

Because of copyrights, I cannot send these out but, you should really buy this book as there are so many different patterns you can use. You can then customize them by coloring them in yourself and then make transparencies of them for your own houses.

Here is the picture of the almost completed porch. 


I just noticed I have 2 more porch posts to add but, for the most part, it is completed.

I only have to paper clay the chimney and foundation. I will save the shingles for last.The instructions for putting the porch together seems a little vague to me and MORE pictures would help. I did not assemble mine in correct order.  I noticed this when I looked at the picture on the box and compare mined to the picture (and I thought I was following the instruction perfectly till then LOL :p ).The structure is still very strong and sturdy so I will not worry about it.