Translate

Monday, June 6, 2011

Lily Dollhouse Building Blog Compelted

November 11 2006
Posted by Minis On The Edge
More Outside Painting

I have just added more colors to the outside of the house. It is really beginning to have it's own personality and I need my houses to talk back to me :whistle:

Here are the pictures:


The new colors add more warmth and life to the house. :)
I dry fitted the porch parts onto the house. Now, I gotta paint them and glue them in place.


February 12 2006
Posted by Minis On The Edge
The Completed Lily

This house was made for a customer of mine and she did not want too many flowers up front but you know me, I gotta have flowers and trees and some form of life to the house. This is why I added things to give the house life but no "Cute" flowers.
Also, because this house was being shipped far away, I could not add a huge base to it so, I took some foam core (1/2" thick) and glued it to the bottom of this house. I then covered it with "Sheet Moss". I then added trees & moss to the the base to give this house the appearance that the yard is kinda unkept and this is what we have now. I will add more pictures shortly!!! 
I am so excited because I know for sure that this house will be featured on the front cover of Dolls House And Miniature Scene Magazine in the UK. It's the first time I have ever been featured in a Magazine. 
You can buy your copy by following the link 

http://www.dollshousemag.co.uk/


You can see completed pictures of the Lily By clicking below:


The Lily Greenleaf Dollhouse


Magazine Cover
Lily On The Cover 

Thought of the day ~ Do not let what you cannot do interfere with what you can do. ~ John R. Wooden
Thank you for stopping by to read my blog!

Tracy

Lily Dollhouse Building Blog Days 9 - 12

October 23 2006
Posted by Minis On The Edge
Adding The Clay


I finished painting and adding the dormers to the roof. After that, I decided to start painting the base coat on the trim that I added to the house (It will get about 4 washes to make it look like stone). I then started adding the clay to the foundation. I also made little clay embellishments that I want to add to the porch to give the effect and mood that my customer wants for this house.

After I finished that, I painted the porch a very dark brown. Then I started adding clay to bottom of the house. I decided to have the random stone effect. Here are the pictures so far:


I also had to redo the floors upstairs and down because I had not added a finish to them before I put the house in the garage


 November 3 2006
Posted by Minis On The Edge
Completing the clay work

I did not realize that I have not added more pictures of the rest of the clay work I have done to this house. It is a large house to add clay too, which means, I am using a lot more clay than I thought I would. It is looking wonderful though.

The outside is all done.


 Finished Roof Shingles


 November 7 2006
Posted by Minis On The Edge
Completing the clay work

I have completed the entire outside of the Lily!!!
;) :whistle: :) :)

I will start painting it tomorrow


 November 10 2006
Posted by Minis On The Edge
Painting The Lily

 I have begun to paint the outside stone & shingles of the Lily and it's beginning to look like an old dreary home (which is the effect my customer wants).

I have added the extra sculpted elements at the bottom of the house around the base. I will add the doors and porch rails. The pictures show only the first color added to the house. More pictures to come soon!!

These pictures almost make the house look like the stones are gray but they are actually a dark brown color.


Thank you For Stopping By to View My Blog!

Thought Of The Day ~ "One man has enthusiasm for 30 minutes, another for 30 days, but it is the man  who has it for 30 years who makes a success of his life" ~ Edward B. Butler 


Tracy

Lily Dollhouse Building Blog Days 6 - 8

August 13 2006
Posted by Minis On The Edge
Hiding Electrical Wires


Please Notice the date above of this blog. I use a different method now in hiding the wires. If you look at some of my current blogs you can see how creative I have gotten in hiding these wires. I still like the hard wire method the best.

I promised to show a step by step on hiding my wires from my lights. First of all, I always look for a a good place to put them in the ceiling. I then start looking for a good corner to hide the wires in:


 I take some quick grip glue and glue your wires into place in the corner


While the glue dry, I add tape to keep them in place. Before I add clay, I add electrical tape to the wires. The clay goes OVER the wall which will cover the tape and wires. If you add the wires in areas where base board/trim will be (which is usually in the corners and op or bottom of the walls) please note that the trim hides the wires very well and you can wallpaper over it that way better too (you won't need electrical tape over the wires and some wood trim have grooves cut into them to fit the hard wire in neatly).


August 13 2006
Posted by Minis On The Edge
Adding Floors

Well I added some of the Hardwood floors. I used Corona Concepts Siding strips to do the floors in the attic. I then started adding the roof supports:


 I used the floor tiles for this room


October 4 2006
Posted by Minis On The Edge
Roof Added

 This house has been sitting in my garage since my last post because We were trying to sell our home. Well, we took it off the Market for now because this is my busy season and I HAVE to finish this house BEFORE I move cause I promised the buyer that I would!!

Well, I felt some of the trim is a bit plain so to add some detail I bought some wood strips from Hobby Lobby with a nice design on it. I then went through LOTS of it trying to miter the ends correctly :whistle:

I also changed the trim color because the Green was not moving me and I don't Think the owner of this house was in love with the color either (Though she never said she was or wasn't).

 
I have been making some Architectural detailed items to add to this house and so now, I am adding more lights and things so that I will only have to the clay left to add on the house :) Here is where I am so far and this blog will be updated Daily now. 
:)


The roof popped in very easily. The roof parts were perforated so they did bend easily for me. The roof trim was easy to figure out. The Verge Board trims were the parts that had me guessing for a while :p .  One tip I must share is to remember to never leave a project without writing good detail notes about where you left off at ;)

October 14 2006
Posted by Minis On The Edge
Adding Roof Trim & Dormers


 At first I looked at the dormer sides and thought I must have been crazy cause I could not figure out how they went :)

 
Well after looking at the INSTRUCTIONS which I had put aside cause I had decided I did not need them anymore ( :whistle: That's what I get Huh, I still need them :) ) , I figured it out and Ohh How I love the dormers and trim and all. This house has a lot of character!!

The Curved part sits right on the roof

  
Then you add the front part

 
I also added my own trim to the roof 


Thank You so much for stopping by to read my blog!
 Tracy
Thought Of The day ~
Give thanks for what you are now, and keep fighting for what you want to be tomorrow.  ~Fernanda Miramontes-Landeros

Lily Dollhouse Build Blog Days 4 & 5

06 June 2006
Posted by Minis On The Edge
It's Electric

 I decided to show a little bit how I electrify the houses. I find it hard to explain in words but pictures talk in words that I may not express well so here you go.

I am just adding the extra outlets that my customer wants in this house right now so that is what the pictures will show. I started out with an electrical outlet with a plug at the end pictured below. The end plug will fit into the electrical strip later on.


Now, drill a hole in the floor where you would like to add the outlet so you can feed the wire through the ceiling and down below the base of the house


Now, take the plug and remove the prongs at the end of the plug. Place them in a cup or soda pop top where you can find them easily! They are so small that if they fall on the floor, they find a way to blend into the carpet or wood floors you may have
:lol:


Now, gently remove the plug base (the white part) from the wire


Now, take that wire and feed it through the hole that you drilled in the floor of the house


Take the paper off of the back of the outlet and stick it into place on the wall


After you feed the wire through the hole all the way to the base or bottom of the house, you will then start adding the parts back starting with feeding the wire through the plug (white part)


After folding ONE wire in EACH hole (Two wires so one wire should fit in each of the two holes), you will then add the brass prongs in the hole in contact of the wire


You can now plug this into a power strip and use your outlet. You can hide the wire behind moldings so they will not be noticed easily.
:o

Hope this helps. I will try and take pictures and show the next step when I get to that part while I assemble the house.


13 August 2006
Posted by Minis On The Edge
Stair Placement & Partitions

Now it's time to glue the staircases in. If you want your foyer to look neat and decorated nicely, NOW is the time to do it (Before you add the kitchen wall and glue in the stairs). It will be VERY hard to reach these areas later on. Originally, I thought a partition went in a different place which means I messed up my flooring! :o

  Please note WHERE these partitions go so you won't make the same mistakes. Notice that the wires for the lights are taped out of the way while I build. I am using paperclay on the inside walls but you can hide these wires later by using wood trim that has a groove cut in it to hold these wires so that you'll never see them.


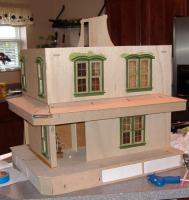
Right Wall & Bay Sides & Back Foundation Wall

This house is coming along WONDERFULLY!!! It has so many details that are missed from the 2 pictures shown on the box of this kit!! I am totally in LOVE with it's design. The bays went together easily and so did the back wall of this house. Here are pictures of where it goes and how


Porch Assembly 

Now this part was a little tricky for me because I do not plan to use the lattice trim on my porch. My foundation will have clay with stones sculpted in them.

Be sure to follow the instructions and lay the house on it's back while you assemble the foundation part. It is VERY important to position porch foundation piece # 1 into foundation slot in the order as noted on the drawings or else it will NOT fit right (I bet you can figure out how I know that one :lol: )


I also had issues finding the porch ends for the top and spent time talking to Lynette (Nutti) on the phone as we both tried to figure the porch roof parts. We got off the phone and I was still a little lost but I pushed forward and was able to finally figure it out. I am such a visual learner and not having pictures with these instructions for this kit really threw me off completely for a bit. I was afraid to use my glue LOL.


The Thought Of The Day ~ Mistakes are painful when they happen, but years later, a collection of mistakes is what is called experience.


 Thank You For Taking The Time To  Read My Blog Today!! Hope You Have a Great Day!

Tracy

 ♥☆♥♥☆♥♥☆♥♥☆♥♥☆♥♥☆♥♥☆♥